Table of Contents
Accurate temperature control is essential for reliable results in high-temperature experiments such as sintering, annealing, and material heat treatment.
Although modern tube furnaces are equipped with built-in thermocouples and temperature controllers, the actual temperature inside the furnace tube or on the sample surface may differ from the displayed value.
To ensure measurement accuracy, researchers often use a handheld K-type armored thermocouple and digital thermometer. This tool allows users to:
-
Verify the actual temperature inside the furnace tube.
-
Measure the surface temperature of the sample during heat treatment.
-
Calibrate the tube furnace temperature system for improved precision.
Why Use a Handheld Thermometer?
Temperature variation inside a tube furnace can result from several factors:
-
Thermal gradients between the furnace wall and the tube center
-
Sensor aging or oxidation
-
Differences in thermocouple placement
-
Heat loss or convection near the tube ends
By using a handheld thermometer, you can:
-
Identify real temperature distribution in the heating zone
-
Measure the exact temperature the sample experiences
-
Verify and calibrate the accuracy of the furnace controller
Equipment Required
Before you begin, prepare the following components:
-
Alumina Tube Plug (Non-through Hole) – seals one end of the furnace tube.
-
Alumina Tube Plug (Through Hole) – allows thermocouple probe insertion.
-
K-Type Armored Thermocouple Probe – measures temperature precisely inside the furnace.
-
Handheld Digital Thermometer – displays and records temperature readings in real time.
Step-by-Step Procedure
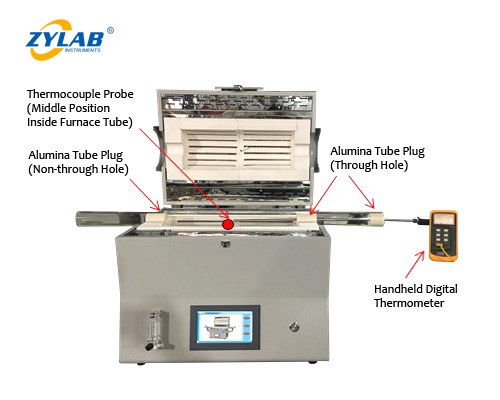
1. Prepare the Furnace
Install alumina tube plugs at both ends of the tube furnace.
Use the non-through-hole plug to seal one end, and the through-hole plug on the other to insert the thermocouple.
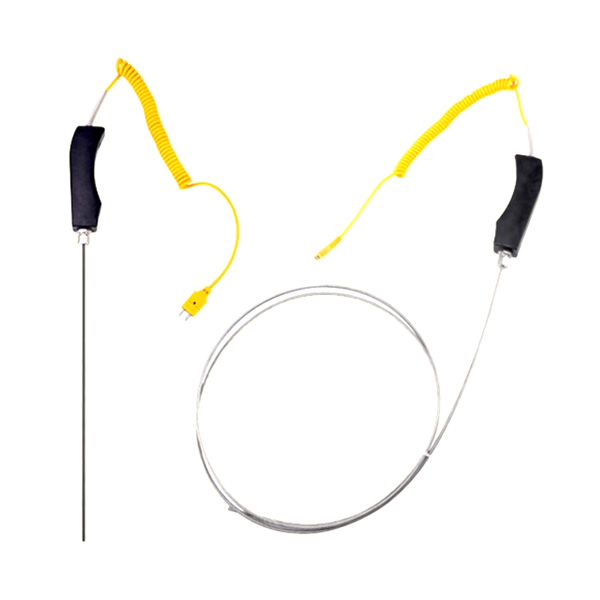
2. Insert the Thermocouple Probe
Insert the K-type armored thermocouple through the through-hole plug until the tip reaches the sample surface positioned at the center of the furnace tube, where temperature uniformity is best.
Ensure the probe lightly contacts the sample to avoid damage and inaccurate readings.
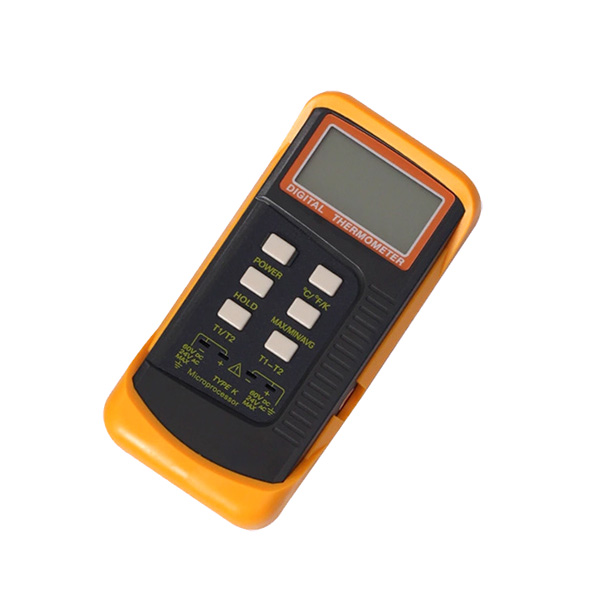
3. Connect the Handheld Thermometer
Attach the thermocouple connector to the handheld digital thermometer.
Check that the polarity is correct and that the connection is secure before heating.
4. Run the Heating Program
Input your sintering or heat-treatment curve on the furnace control interface.
For example:
-
Target temperature: 400°C
-
Heating time: 40 minutes
-
Holding time: 60 minutes
During the holding phase, observe the temperature on the handheld thermometer once it stabilizes.
5. Record and Compare Data
Compare readings from the handheld thermometer and the furnace display:
-
Furnace display: 400°C
-
Handheld thermometer (sample surface): 395°C
-
Deviation: 5°C
This difference represents the true sample temperature and can be used to calibrate the furnace controller. Repeat the process at higher setpoints (e.g., 500°C, 600°C) to confirm consistency.
Tips for Accurate Measurement
-
Always measure at the center of the heating zone for uniform results.
-
Keep the thermocouple clean and replace it periodically to avoid oxidation errors.
-
Use alumina plugs to maintain a stable furnace atmosphere.
-
Allow the probe to cool naturally after use.
-
Avoid bending the armored thermocouple sharply to extend its lifespan.
Conclusion
The ZYLAB Handheld K-Type Armored Thermocouple and Digital Thermometer is an essential tool for laboratories and industries using tube furnaces.
It enables users to:
-
Verify actual furnace temperature,
-
Measure sample surface temperature, and
-
Calibrate temperature systems for long-term accuracy.
By integrating handheld temperature verification into regular furnace operation, researchers can achieve greater precision, reliability, and repeatability in their heat treatment processes.
Get In Touch
Fill out the form below — free quote and professional suggestion will be sent for reference very soon!


